Sharing Honestly About the Pros and Cons to Kitchen Floating Shelves
Are you considering kitchen floating shelves but worried about not having enough storage space?
You love the look but are hesitating because people keep telling you it’s not a good idea, especially in small kitchens.
Or maybe you have plenty of storage, but kitchen shelves scare you because you’re worried about things getting dirty all out in the open like that.
Well, I’m here sharing open and honestly about what it’s really like to have floating shelves, so you can decide if they are going to work for you.

Use these links to quickly find what you’re looking for:
Just a quick heads-up: Everything in this post reflects my genuine opinions and recommendations, but it’s not a substitute for professional advice. To keep this content free, I use ads and include affiliate links, which means I earn a small commission at no extra cost to you.
6 Things I Hate Most About My Kitchen Floating Shelves

With kitchen floating shelving, there are a few potential drawbacks and here is what I disliked most:
Finding Affordable Kitchen Floating Shelves
High quality shelves cost a fortune. I mean come on, it’s just a piece of wood with a few holes in it, for crying out loud!
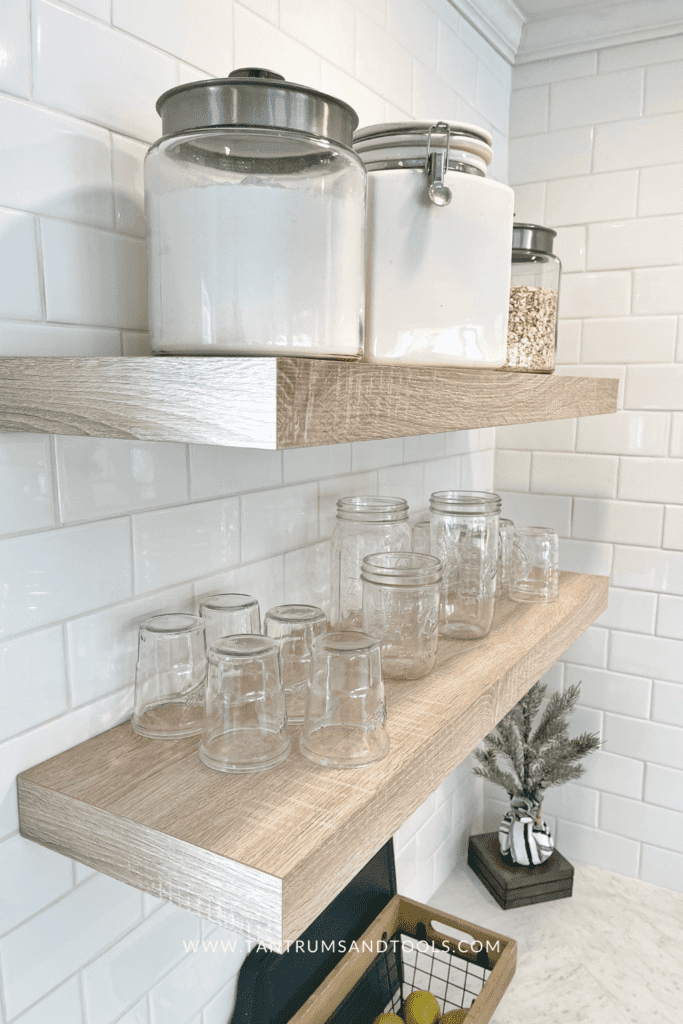
The floating shelf options are abundant, but the problem was finding affordable ones. Now that took perseverance! After endless nights of scrolling through option after option, I finally found these light oak shelves that were ridiculously reasonably priced.
Determining The Layout for Floating Shelves and to use 2 vs 3 Kitchen Shelves
Man, finalizing a layout for my open shelves was stressful! I mean, I did not want to mess this up because installing these shelves included drilling holes into my tile backsplash.
This is not something you can easily fix. So, I definitely felt the pressure to get it perfect the first time.
- Are 2 shelves high enough or should I do 3
- How long should the shelves be
- And How far apart
- How deep should kitchen shelves be
- What is the ideal floating shelf height above the counter
- Is 2 inches thick enough or too much
Ahh! The floating shelf layout decisions were overwhelming.
Worrying About Cracking a Tile or Making a Mistake When Installing the Floating Shelf Bracket
I’ll be honest, we procrastinated installing these just out of fear of how difficult the project would be. My dad had never installed this type of bracket over tile before, so he was worried about cracking them, and when dad is worried, I freak out because he’s the pro!
The truth is, installing floating shelves is way more challenging than simply hanging cabinets. It requires meticulous measurements, and proper leveling. Lots of leveling!
But, don’t mistake me, the challenge is in the precision not the physical demands. And when you have the right tool, it was actually pretty ok! Both my dad and I agreed the install went way smoother than we imagined.
Decorating Kitchen Floating Shelves Without Them Looking Cluttered

My fear when decorating kitchen shelves was things would look cluttered. That’s because with kitchen floating shelving, all your dishes, small appliances, spices, utensils, or whatever else may be hiding in your cabinets is now on display.
Exposing what is inside your cabinets can quickly look messy. So, switching from upper cabinets to open shelves took major de-cluttering to be sure what I put on display sustained a collected vs cluttered look.
It also turned into re-organizing the entire kitchen and pantry because I had to shuffle things around since not everything would be a good fit for having on display.
Severely Limited Storage Space with Floating Shelves
It didn’t take much to fill up these shelves!
Too many items together looked cluttered. And too many different colored items together look chaotic. But I had to put as much as I could on these shelves because if not then I was down to, like no storage!
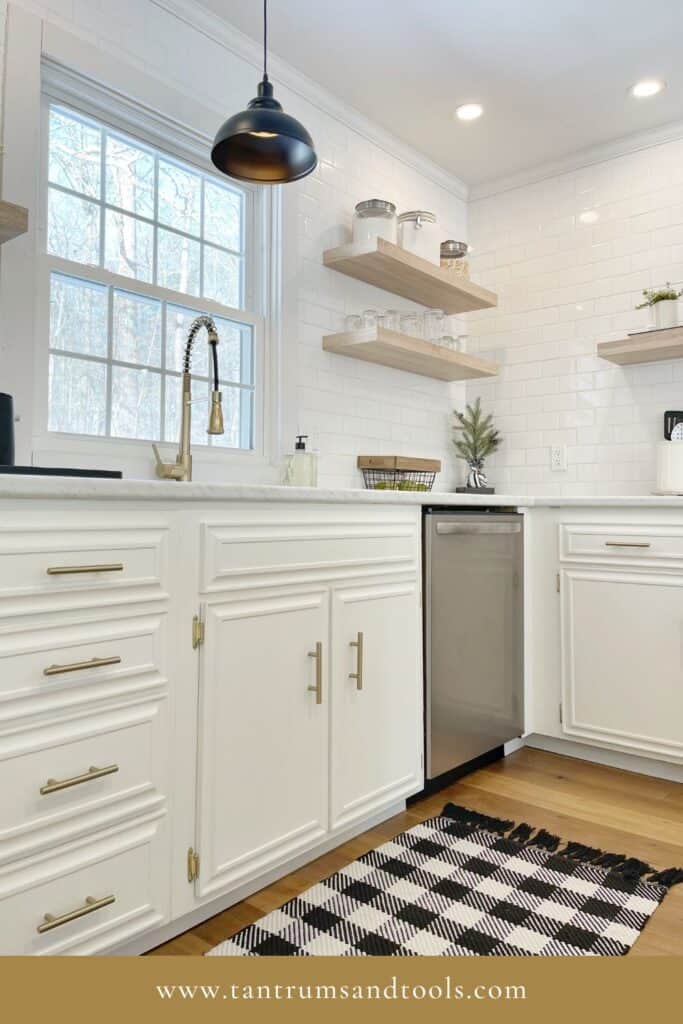
My kitchen was small and lacked storage to begin with. I had a total of 5 cabinets, so when I say space was at a premium, I mean it.
It was a bit of a balancing act between maximizing what I put on the shelves, finding a new spot for things that didn’t look on the open shelf, and keeping the color palette light and neutral, and doing this all without having to buy entirely new kitchen dishes and glassware.
Added Hassle of Another Thing to Clean
You guessed it. Kitchen floating shelving requires more routine maintenance to keep clean compared to cabinets. More dusting is a guarantee. That is unless you already clean your cabinets weekly. In that case, floating shelves will be no extra cleaning for you.
But, if you’re anything like me, I’m not cleaning my cabinets every week. Could they use it, probably? Is it totally necessary? Nah.
Floating shelves are different, though, because dust collects on and around the dishes I eat from, so keeping these clean is a bit more of a necessity.
Every successful DIY project starts with a plan. That’s why you need the Project Planner Pack.
Unleash your creativity with a click, download your Planner Pack and start your DIY journey today!

10 Surprisingly Positive Benefits of Kitchen Floating Shelves
First, they are so pretty to look at! Simple as that.
Ok, but that’s the obvious.
So, what are the positives of having floating shelves? I’m so glad you asked…
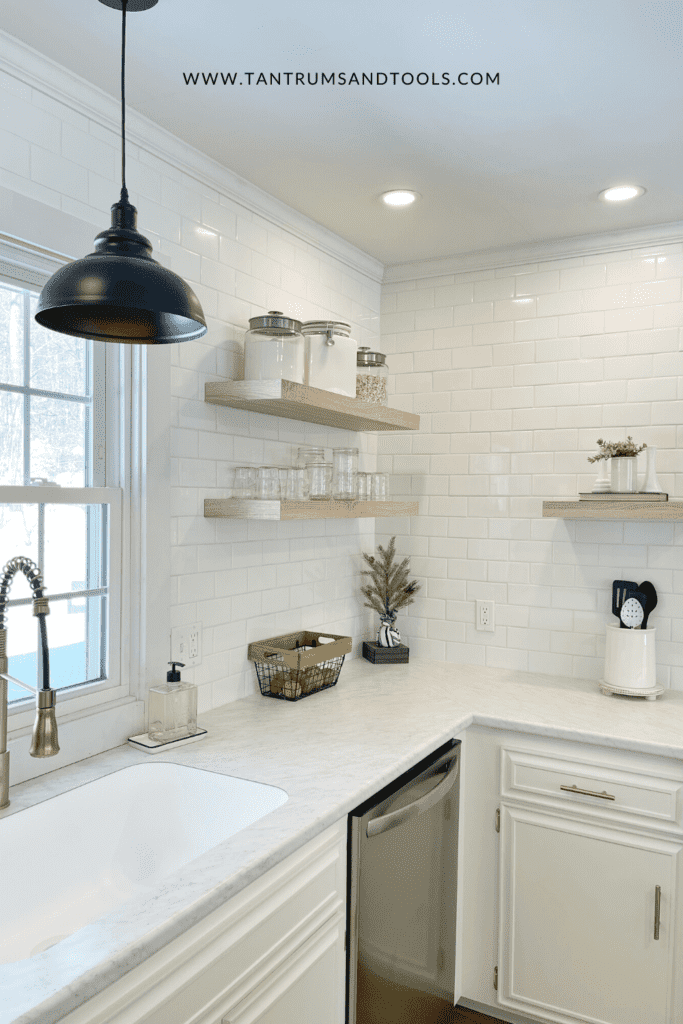
My Ceilings Instantly Felt Taller
Floating shelving visually and physically take up less space than a cabinet, so the outcome is a more airer or larger feeling space.
Your area instantly feels bigger, which is particularly beneficial in a small kitchen like mine. If you have an average-sized kitchen, floating shelving is still a good option because, let’s be honest, who doesn’t want their kitchen to feel larger.
Putting Away Dishes is a Breeze with the Convenience of Open Shelves
With open shelves, everything is within easy reach, making it convenient to grab frequently used items, such as dishes and cookware. That’s because you don’t need to open and close cabinet doors.
Does that make me sound lazy? Well, I don’t think so because as a busy mom, I’m all about efficiency and floating shelves help to save me time in the kitchen.
Whether it’s serving dinner or emptying the dishwasher. The convenience factor is surprisingly noticeable!
Also, if your kitchen layout is a little tight, like mine, then it’s very possible floating shelves will increase the functionality of your space.
If you look at my kitchen, when I have the dishwasher open, my access to the upper cabinets in the corner is limited. The dishwasher door extends into the space where I need to stand. Does that make sense, why having wide-open access to the shelf, vs trying to open that cabinet door, improves functionality?
An Excuse to Find More Thrift Store Decor
Decorating kitchen shelves gave me the perfect excuse to hit up the thrift stores. Because of course, I needed to find that perfect piece of decor that I didn’t already have.
Ok, let’s be honest, I’ll take any excuse I can get! But shopping thrift stores was the perfect way to personalize my kitchen space.
Luxury Designer Look on a Budget
You recall how much I love floating shelves because they simply look pretty. But not just pretty, they look luxury. Like a designer remodeled my kitchen.
I too was surprised by just how good these shelves looked. And how much they transformed my kitchen from your basic updated kitchen to modern farmhouse magic!
>> Find out how to determine the most ideal floating shelf size in this post!
Wood Floating Shelves That Actually Cost Less Than Kitchen Cabinets

Don’t get me wrong; as I mentioned above, during my kitchen remodel, I come across some wood floating shelves that were more expensive than a cabinet. But, in the end, I found something that looked expensive but cost much less than a cabinet.
A luxury look for less is always a win in my book!
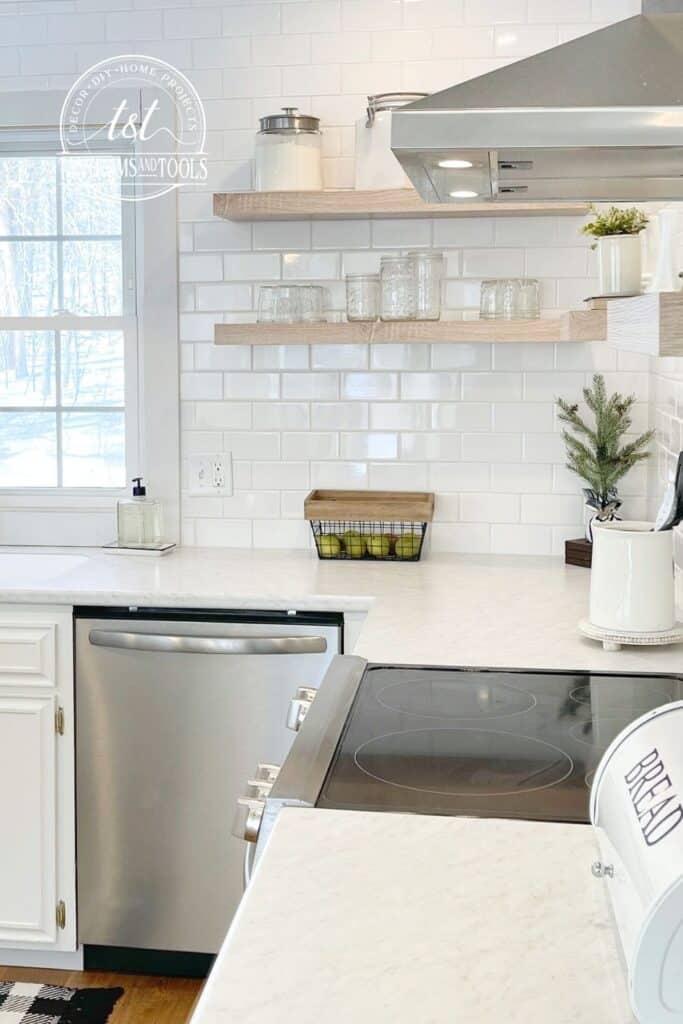
Perfect Solution for What to Do with that Awkward Kitchen Corner
You know which one I’m talking about! We all have at least one. Every kitchen has that space in their kitchen they just do not know what to do with.
Mine was to the left of the sink, where there was a sliver of wall space between the window and fridge. Not enough to do much of anything with, but just enough to look empty when left blank.
Installing floating shelves in unused or awkward spaces is a win-win because it looks good, and it gives that space a function.
Installation Was Not Stressful
That is because we had the right tool! And had thought about the layout for quite some time before jumping into the install.
Although we stressed about and avoiding installing these shelves for far too long. Once it came to the actual installation, it was a breeze!
Maximum Cozy Kitchen Vibes
Every time I catch a glimpse of my kitchen, I smile and feel at ease because the space is so welcoming and cozy. I attribute this to the warm wood tones, and texture the shelves add. This juxtaposition on the white tile backsplash makes my heart happy.
With a happy heart, comes a happy home!
If you prefer a clean and organized kitchen design, with a pinch of cozy, then floating shelves may have the same effect on you.
Less Grooves to Clean on a Floating Shelf Compared to a Kitchen Cabinet
After having shaker cabinets and kids, I can honestly say, I want flat fronts because what a pain it is to clean those grooves!
Although with floating shelves you’ll have to clean more often, at least the time it takes is less. Just a quick swipe with the duster and done. It’s so much easier because they are open and easily accessible.
Say good-bye to the hassle of cleaning cabinet doors and handles.
Instant Organization Inspiration
The most frequently asked question about my kitchen floating shelves is, “but where do you keep all your stuff?”.
My answer and thought process are simple; the more storage you have, the more stuff you collect.
Open shelving encourages you to be organized and selective about the items you display. I don’t miss the upper cabinets. I was able to condense what I truly needed and donated the rest!
Pics From My Kitchen to Inspire Your Choice
For those of you who need a visual to go with all that info, this is for you! Because I am that person too.


I may love mine, but kitchen open shelving is definitely not for everyone.
I’ve found people are so opinionated about their love or hate for them. So, what about you? Are kitchen floating shelves for you?
Leave me a comment and let me know!
Team Shelves or Team Cabinets!


Stop piecing together information from different sources and get everything you need in one place.
Save time, avoid costly mistakes, and achieve the transformation you’ve been dreaming of.
Grab your copy of the Ultimate Furniture Makeover Guide.