
German Schmear is such a simple way to add tons of character to brick flooring, and in this post, I’m showing you exactly how to get the look!
From the tools and supplies I used to the secret sauce of my technique—it’s all here. If you love that old-world brick vibe with cozy, lived-in charm, you’re definitely in the right place.
It’s a little messy, a lot of fun, and totally doable, even if you’re new to DIY!
Just a quick heads-up: Everything in this post reflects my genuine opinions and recommendations, but it’s not a substitute for professional advice. To keep this content free, I use ads and include affiliate links, which means I earn a small commission at no extra cost to you.
Tools and Supplies to German Schmear
If you’re ready to try this German Schmear technique, this list has everything you need to get started. Here are the exact tools and supplies I used to German Schmear my laundry room brick floor.
- Bricks: General Shale in the color Stillwater
- Mortar: Ready Set Thinset Mortar 3.5 gallon
- Trowel: 1/4 inch square notched
- Spacer: 1/4 inch
- Grout: Bright White 1 gallon
- Grout Bag
- Grout Float
- Sealer: TileLab SurfaceGuard

Click to shop all my German Schmear tools and supplies!

German Schmear Technique
If you’re on my email list, then you already know all about how this brick floor came to be (psst join my list here! It’s where I share the real story behind the pretty pictures—what I’m working on, how I’m feeling, and what’s actually happening as I turn this house into home. This is my absolute favorite way to connect and I hope to see you there!).
I decided to take on this project after realizing my original stenciled floor idea was going to clash with the laundry room wallpaper.
So, a last-minute Friday night drive to Plattsburgh was in order to pick up the bricks. Because, you know, Vermont can never have the good stuff in stock. Then came the fun part—overthinking the herringbone pattern, followed by lots of cuts.
It took a lot of brainpower and even more trips up and down the stairs to the basement to use my grinder, but once it all came together, it was totally worth it!
Now that you’re up to speed, let’s get into the German Schmearing! I seriously love the German Schmear technique. This is my third project using it (see my fireplace makeover here), and I’ve really figured out what works. It’s definitely more of an art than a science—which is exactly why I enjoy it so much!
German Schmear Step-by-Step
First, I let the mortar set for about 24 hours. Then it was time to grout. I used my float to scoop a few big globs into the grout bag, but honestly, whatever works for you is fine. No fancy tricks here, just whatever gets the grout in the bag.
I ended up trimming the top of the grout bag just a bit—enough to make it easier to fill, but not so much that I couldn’t still twist it at the top.
Once the grout was in, I twisted it closed like a bread bag and pushed everything down toward the tip to get all the air out. This keeps things smooth and gives you way more control when you’re applying it.
Next, holding the bag near the tip, I started squeezing the grout into the lines. I made sure to stick the tip right into the crack to really fill the space. I actually overfilled just a little on purpose, just enough! You can always go back and add more if needed, but it gets messy and tricky if you have to remove too much.
I filled the grooves around several bricks—do as many as you’re comfortable with, but keep in mind you don’t want the grout to dry. I recommend doing just a few at a time so you can stay on top of it.
Here’s a look at how I filled the spaces between the bricks before starting the “schmearing” process:


Once the grout lines were filled, I grabbed my grout float and used it to push the grout down into the grooves. This helped ensure the space was fully filled and compacted.
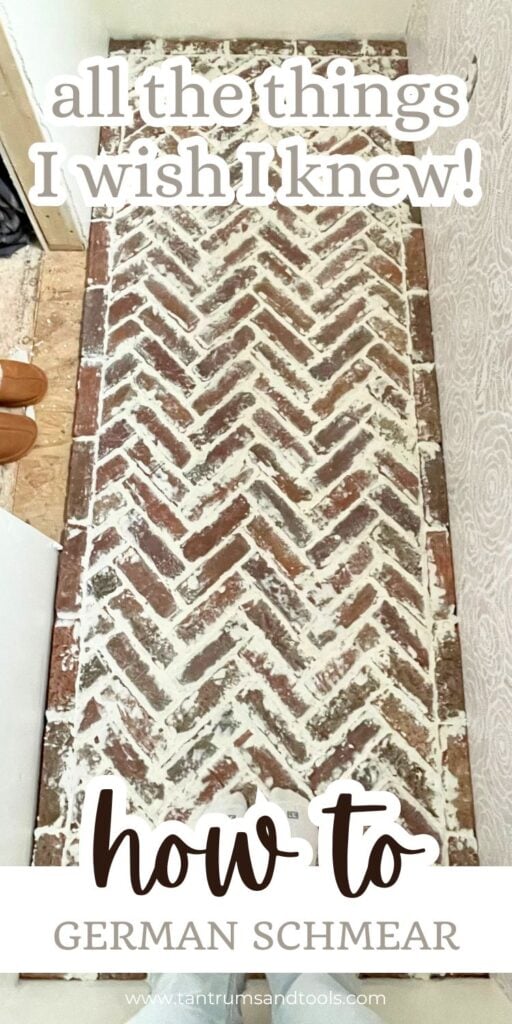
Then, with the float, I made an X-pattern. Starting on the left side, I pulled downward to the right, lifted the float, and then started from the right side, pulling downward toward the left. It doesn’t have to be a straight pull every time. I mixed in short, controlled movements with longer pulls as I pushed the grout down into the groove and slightly over the edges.
Here’s the secret sauce to my technique: I did not rub the grout across the entire brick, and I did not use water.
Here’s why, doing that, in my opinion, gives more of a whitewashed, limewashed, or paint-washed effect, which isn’t the look I’m going for. This technique is more of an over-grouted finish, and that’s exactly the vibe I wanted.
Like I said, this technique is way more of an art than a science, so it’s kind of hard to explain step-by-step. It might be more helpful to see what I did—I’ve saved the whole process in my Laundry Room highlight on Instagram, so go check it out!
What I love about this is how it subtly tones down the red in the brick, giving the floor a softer, more organic feel. It pairs so perfectly with the feminine wallpaper—such a good balance of texture and style!
And now for the best part—here’s the before and after:


The last step is to seal everything in! After the grout was done, I let the floor sit for a few days before sealing it—mostly because, well, life. But realistically, you should wait at least 24 hours to let everything cure properly before moving on.
When I was finally ready, I gave the floor a good sweep to get up the loose stuff, then went over it with a vacuum to make sure everything was clean and dust-free. You don’t want any grit getting sealed in.
I ended up applying three coats of sealer using a combo of a paintbrush for the grooves and a roller for the bigger areas. The process is super simple and super fast.
How many coats you do is really up to you. Think about how the room will be used. For high-traffic spots, you’ll probably want more protection. But if it’s a space that’s not going to see a ton of wear and tear, you can totally get away with less. Either way, sealing is key for locking everything in and making sure all your hard work holds up!
How Long Did This Take?
The actual German Schmear part took me about two hours. It’s a little messy, but once you get into the groove, it goes pretty quickly!
How Much Grout?
I used a full gallon of grout for this 20-ish square footage space—but keep in mind, my brick didn’t have any grout to start with. If you’re doing a German Schmear over brick that’s already grouted, you’ll need less!
Hey girl, loving this project idea?
📌 Pin it now so it’s easy to find when you’re ready to tackle it. Just hover over the image and click the Pinterest button 👇


More Projects From This Laundry Room
(check back for these posts- coming soon!)
- Peel and Stick Wallpaper
- Herringbone Floor
- Decor Details
I absolutely love how the German Schmear technique softened the brick flooring and gave the space such a warm, cozy, and organic vibe. It was honestly such a fun and easy project. Once you get into it, it really just flows!
Shop all the tools and supplies you need for this project here!


What do you think of this look? Are you thinking about trying it yourself? Let me know in the comments! I’d love to hear what you think or answer any questions you have.


Stop piecing together information from different sources and get everything you need in one place.
Save time, avoid costly mistakes, and achieve the transformation you’ve been dreaming of.
Grab your copy of the Ultimate Furniture Makeover Guide.


